How to Build Your Own Gaming PC from Scratch?
Are you looking for a custom gaming PC? Finding a computer that meets your needs isn't easy. Build yourself a killer gaming PC to suit your needs. When you build your own gaming PC, you have control over the parts that go inside. However, your system must meet the game's requirements. Complete the setup so you don't run out of space while gaming.
When you first start building a computer inside a case, you might think that assembly is the only game in town. But the process isn't easier than you think. So, here is your ultimate guide to becoming one of the expert builders.
Simple steps to build a gaming PC
The PC assembly process involves tightening screws and connecting cables. So make sure everything is correct to get the perfect setup.
PC building tools
Before you start building your computer, gather the tools you need. You need to prepare your workspace so you can focus on the process.
Workplace
You should have a large workspace or desk to set up the system smoothly. Also, stand on an uncarpeted surface to avoid damaging components from electrostatic discharge.
Screwdriver
When installing the components, you will need a screwdriver to secure them. Instead of using an electric screwdriver, buy a magnetic screwdriver so the screws don't fall into the housing.
Additional tools
● USB flash drive
● Moving light source
● Anti-static wrist strap
● Cable ties
● Scissors
Gaming computer parts
One of the most important pieces of gaming gear is hardware. It takes into account the speed, frame rate, and overall performance of your PC. Once you've gathered all the tools, it's time to repair the components.
1. Prepare the motherboard
The motherboard is the basic circuit board that connects everything. The CPU as well as components such as hard disk, memory card, WLAN card and graphics card are integrated on the motherboard. It is the main part that controls the performance of your PC.
2. Install CPU
Once you have your motherboard set up, you can install the CPU on it. When installing the heat sink, apply thermal paste and secure with screws. A heatsink is needed to prevent the CPU from reaching higher temperatures. The gigahertz number of the processor also plays a role. Getting a higher gigahertz CPU makes the processor work faster. This speeds up data processing.
3. Install memory
Repair the memory slots on the motherboard. Do not touch the gold pins on the bottom of the CPU. Instead, hold the memory module sideways. Align the notches of the RAM stick with the memory slots. Apply light pressure when installing. When RAM has a larger storage capacity, it can perform processing tasks faster and at a higher frame rate. Memory is an important component in improving your gaming experience.
4. Install the motherboard into the chassis
Before tightening the motherboard:
● Screw the gasket into the hole in the housing.
● After tightening, insert the motherboard. It will be difficult to place the motherboard without tightening the brackets first.
● Leave some space on the back of the chassis to adjust the I/O ports.
● Tighten all parts and proceed to the next installation process.
5. Install GPU
The GPU must be pushed into the memory slot and secured with screws. If you expect super graphics, use more GB of RAM. So, what you need is a powerful CPU, more GB of RAM, and a high-quality GPU.
6. Install the solid-state drive (SSD).
You have two storage options: a hard drive or a solid-state drive (SSD). Hard drives have greater storage capacity and allow mechanical systems to read and write data. However, SSDs use batteries to transfer data. As NAND flash memory technology continues to evolve, SSDs are becoming more popular in gaming PCs. Not only does it save energy, it also saves file transfer time. Therefore, connect the solid-state drive to the storage connector and secure it in the drive bay.
7. Install cooling fan
Cooling fans keep the system at a moderate temperature. Gaming gear focuses on PC performance, consumes a lot of power and generates high temperatures in the system. So, let the air flow push the hot air away from the machine. You need to mount the fan to the motherboard along with the mounting bracket. When connecting the CPU fan, continue to apply downward pressure to adjust. There are also two fans: one moves cooling air into the PC, and a second fan blows hot air out of the system. How to cool your computer and prevent damage. Adding a CPU fan, cooling fan, and cooling kit will ensure your system works properly.
8. Install the power supply
When it comes time to install a power adapter, you should know how much power your device requires to function properly. Gaming PCs need to be serious workhorses. Therefore, you need a powerful power supply. Such systems have higher voltages and dissipate more heat. Therefore, adjust the cooling fan or internal airflow to avoid heating.
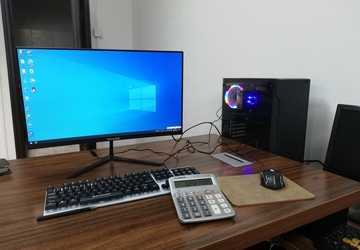
9. Connect cables and connect peripherals
When the system is almost ready, make sure you have installed the CPU, GPU, cooler, USB, audio, fans, etc. and power it according to the instructions.
10. Install the operating system
Another step is to look at the visual representation and operate the system. Most gamers choose PC for gaming because of its peripherals. So, buy a monitor, connect a mouse, keyboard, and headphones and enjoy gaming. When the screen appears, you need to enter the BIOS. The BIOS displays information about each installed system. Make sure the BIOS recognizes everything.
11. Startup
Once you've assembled the parts and created the entire system, press the power button. Check that everything is working properly: computer screen and flash drive. Once done, boot the operating system and install it. Then restart your computer. It boots from a USB stick. The operating system needs to be installed when booting.
Conclusion
Building a PC is a complex process that requires extensive knowledge of the system. Learn the mechanics of the PC components you need and how to repair them. If you're new to system setup, follow the instructions above to set up your gaming PC.
Related Posts
- 5 Best Practices for Data Backup and Recovery
- How to Develop Cross-Platform Apps: Tools and Techniques
- 4 Most Important Gadgets for Remote Work to Boost Productivity in 2023
- The Rise of Smart Homes: What You Need to Know
- What are the Best Apps for Learning a New Language?
- Where to Find Affordable Home Security Cameras